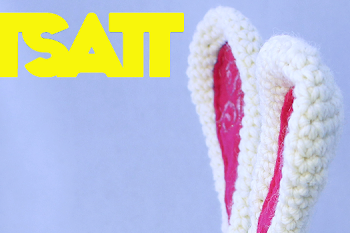

In order to celebrate Spring and the awakening of Nature from its deep winter slumber we wanted to make something fun. Eggs are known as a symbol of life and the Bunny is known for having lots of hmm.. kids, so it makes sense that the Easter bunny carrying an egg basket jumps around on many images this time of the year. Bunny ears continue on with the playful symbolism that comes about around Easter. In these two videos you will find a DIY tutorial over how to crochet your own Bunny ears to wear on your head for Easter or other occasions...

To make these Bunny ears you will need the following:
- White yarn 5 mm
- Crochet hook 4 mm
- Pins
- Pink felt
- White and pink thread
- Scissors
- Optional decoration:
- crocheted flowers, beads, buttons...
PART 1
BASE or HEAD BAND
Ch 55, sc in 2nd ch from hook, 53 st across 4sc in first loop, sc in each of next 50 loops, 2sc in last loop, sl st to join to first sc worked, ch1 and sc in next 50 loops, start sc around the whole project ch1 in the end (curve) of each side. Every time you pass this will keep your project flat. Continue with sc until it measures 6,5 cms. Once finished, in each of the sides chain as many stitches as you need to make the straps of the headband. The trick is to keep measuring in front of a mirror until you get the ideal length.
PART 2
BUNNY EARS ( Make two): - Round 1 - Ch 6 into a magic ring (6 sts)
- Round 2 - 2sc around (12 sts)
- Round 3 - [2sc in next st, 1sc in next st] around ( 18 sts)
- Round 4 - [2sc in next st, 2sc in next st] around ( 24 sts)
- Round 5 - [2sc in next st, 3sc in next st] around ( 30 sts)
- Round 6 to 8 - sc around ( 30 sts)
- Round 9 - [sc2tog in next st, 3sc in next st] around ( 24 sts)
- Round 10 to 20- sc around ( 24 sts)
- Round 21 - [sc2tog in next st, 2sc in next st] around ( 18 sts)
- Round 22 to 28 - sc around ( 18 sts)
Fasten off and sew to the headband with a tapestry needle and white yarn.
We are not using fiberfill stuffing since we are using the flat shape of the project to make the ears look more realistic. Cut two pieces of pink felt in the same shape of the ears but smaller and sew them in the center of the ears. Use white thread, so when you sew it will not be visible in the back of the ears.
Decorate your bunny ears with anything you have, for example glitter, beads, crocheted flowers, by embroidering something, etc. It is up to you and your imagination! Happy Easter Hook Ninjas and good luck!
Amigurumi related creations available in our Etsy store.
See our list of Amigurumi patterns